This article is also available in:
Français
For 6 years, the French Youtube channel Nexus VI has been publishing videos focusing on sci-fi in all its forms, from movies and TV series to games and books. The episode themselves take place in a sci-fi setting: we follow “The Captain” and his crew in a spaceship, somewhere in the future.
A few months ago, an impressive episode of their adventures was unveiled, the first from a trilogy: the Captain gives us his thoughts about Luc Besson’s The Fifth Element, while he and his crew are being chased by enemy ships.
The episode features some impressive CGI/VFX, way above the vast majority of Youtube projects. Almost all these effects were created by French artist Romain Toumi using Blender. He agreed to tell us about this project. Here is the full episode: dialogues are in French but English subtitles are available, and you will find under the video the timestamps of the most impressive CGI sequences.
13:03 – dogfight sequence
15:46 – looping spaceship
16:01 – sequence inspired by Star Wars Episode VIII
17:10 – asteroids dogfight
24:08 – hologram
31:24 – grappling hook sequence
32:10 – beginning of the climax, atmospheric entry
3DVF: Hello, Romain, and thanks for this interview! Our readers may already know your work if they are sci-fi fans, since you’ve been working for the Youtube channel Nexus VI (over 230 000 subscribers) for a while. You handled the vast majority of the CGI/VFX sequences from episode VII, with some very impressive work, especially given the constraints of a Youtube channel (small budget and crew). But just before we dive into this project, can you tell us a little bit about your career?
Romain Toumi: My career path is quite a mess! [laughs] I wasn’t very good when I was in middle school, and I was advised to join a “Lycée Professionnel,” courses available in France for students who won’t continue into higher education. There, I studied metallurgy. At this time I was interested in CG/animation. And my studies involved computer-aided-design, which is kind of related.
After graduating, the company that had hired me ended up shutting down. Unemployement allowed me to switch careers and I became a self-taught artist.
In 2016, my friend Jordan Tetevuide and I launched C3N Studio, our own CGI/VFX/Animation studio. I was convinced that everything was going to work out, that I would be able to create CG animation movies by myself… In this kind of situation, pretty quickly reality sets in. I worked on a few projects here and there such as websites, brand logos. While trying to canvass new partners and customers I got in touch with Fensch Toast, the production company behind Nexus VI. I met them and worked with them on a music video for the English singer Matt Elliott, this was my first commercial visual effects project. Things went smoothly and I liked their projects from an artistic point of view, we became friends and we ended up talking about the Nexus VI ship, and how cool it would be to be able to see it from outside [Editor’s note: in the first episodes, only the interior of the ship can be seen]. This is how I began working on my first big CGI project!
I am now working full time on the Nexus VI channel, on their trilogy of episodes (episodes 7, 8 and 9, episode VII being the one that is already available), and I let go of my old company.
3DVF: Since the team behind Nexus VI is passionate about cinema and sci-fi, we can imagine they have lots of visual references and ideas in mind when shooting an episode. How does this affect the way they shoot an episode, for example when it comes to choosing between practical effects and CGI?
The real sci-fi fan is the Captain (Renaud Jesionek), who writes the scripts and movie analysis. Alexandre Marinelli, the director, may not be as huge a sci-fi fan. He has done a lot of editing for trailers, and you can really feel it when watching Nexus VI: lots of cuts, which is perfect for Youtube. He also directed various projects with a wide range of artistic approaches, and he even won the Audience Award at the Nikon Film Festival, for a short film that contains some of my work! [Editor’s Note: you can watch this short below; please note, however, that the short is in French, without subtitles]
Back to the subject at hand, there is a collective process behind each episode, to decide what will be done in CG and what is going to be done using practical effects. Alexandre Marinelli and I are at the heart of this discussion, but the Captain is also always involved, he asks questions before even starting to work on the script, shares some suggestions. Same thing for Cyril Chagot, our producer. [Editor’s note: Cyril Chagot also plays the voice of the ship’s AI]
Of course, the script also has to take into account our budget, even if we try to keep a great creative freedom.
For each episode, the four of us meet several times, Alexandre explains his wishes as the director. Then, for a few days, Alexandre and I work on the editing of each scene, and we create a list of the shots we are going to shoot.
Then comes the storyboarding process…
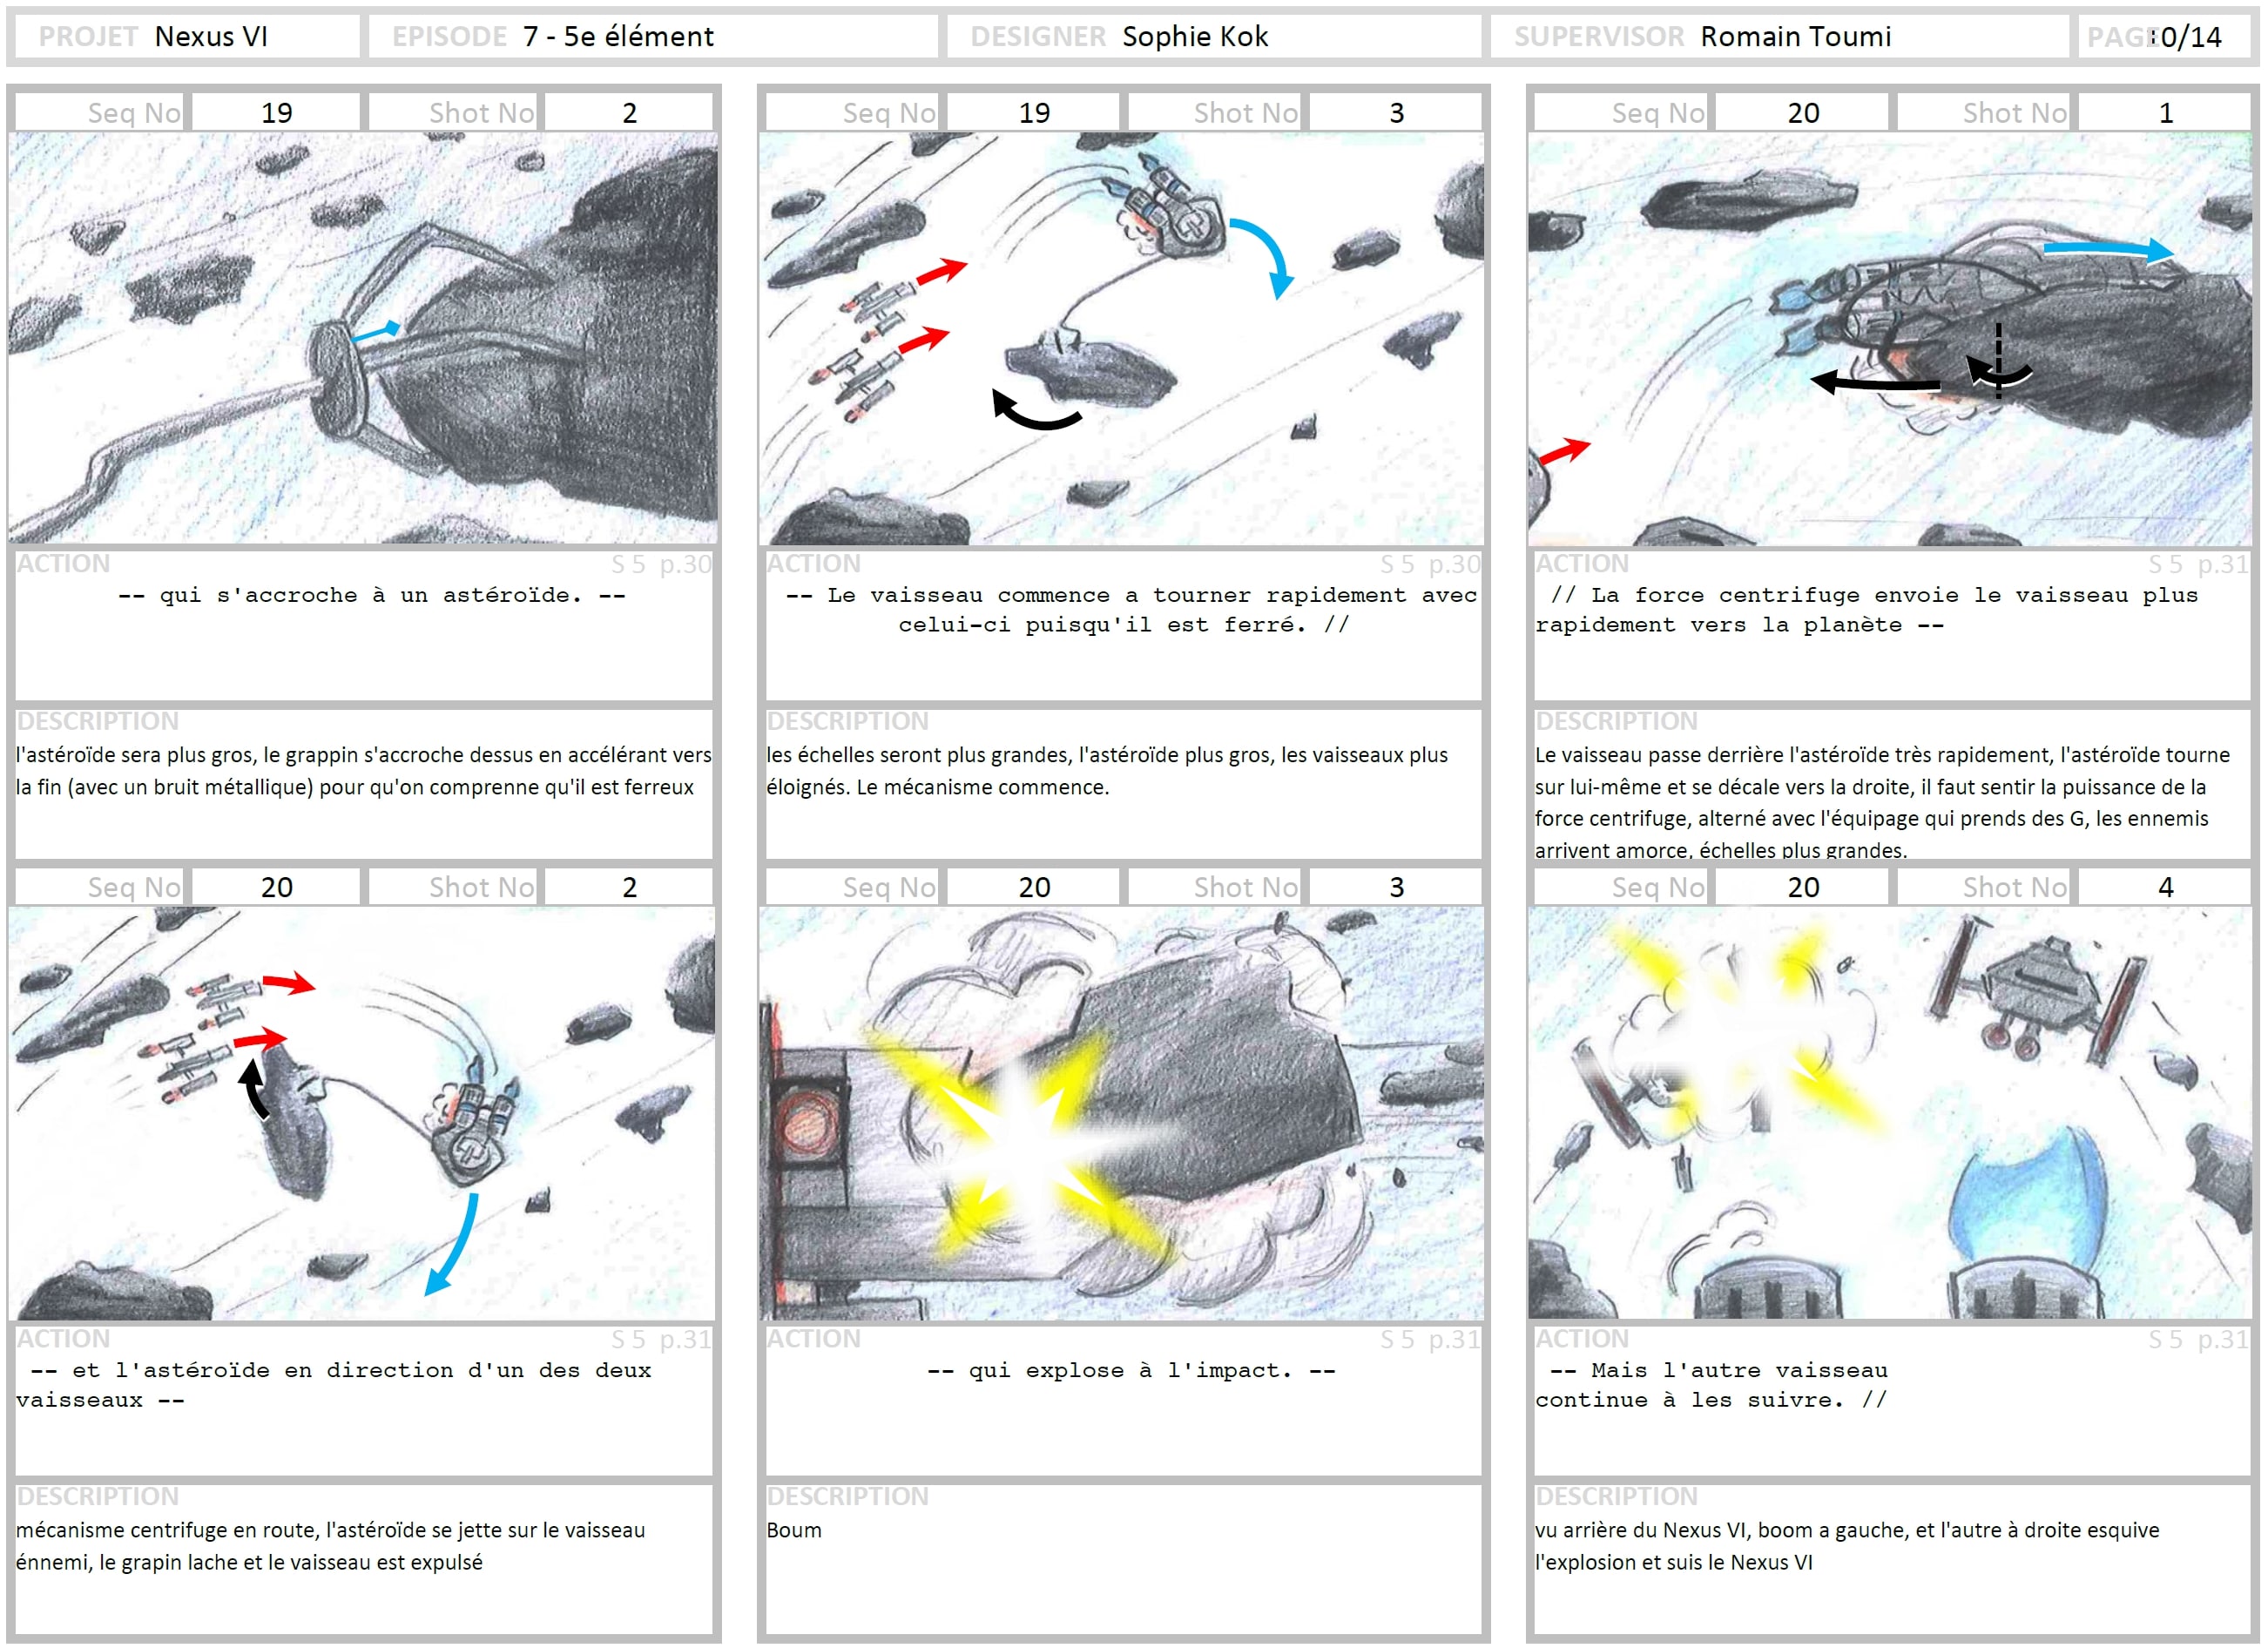
As you can see if you take a look at the grappling hook sequence [which begins around 31’24” in the episode] we never fully stick to the storyboard, we don’t really use it to precisely define the shots. Instead, the storyboard is a creative tool, we use it to explore each scene.
In the end, there is a lot of improvisation during the editing process. Alexandre adds black screens every time a CG sequence is already supposed to be added… But also everywhere he feels like it, using notes to explain what his vision is.
This approach creates a lot of unscheduled work, of course, but it allows us not to be limited or constrained by the script. Overall, the thought process when it comes to CGI/VFX begins when we start working on the script, and won’t stop until the very end. I even added a CGI shot one week before the premiere screening!
Once the black screens have been added during the editing process, and even after the editing is approved, we keep tweaking things. For example we replace the black screen with my layout/animatic.
We then send the result to the person in charge of the sound and music. Which means we sometimes need to cut a few things here and there, tweak the editing, discuss things…
As you can see, our approach is much more fluid and flexible than what is usually done in the industry. We also sometimes make some peculiar choices: we had announced when exactly we would launch Episode VII before even starting working on some CGI shots! Most studios wouldn’t dare do this.
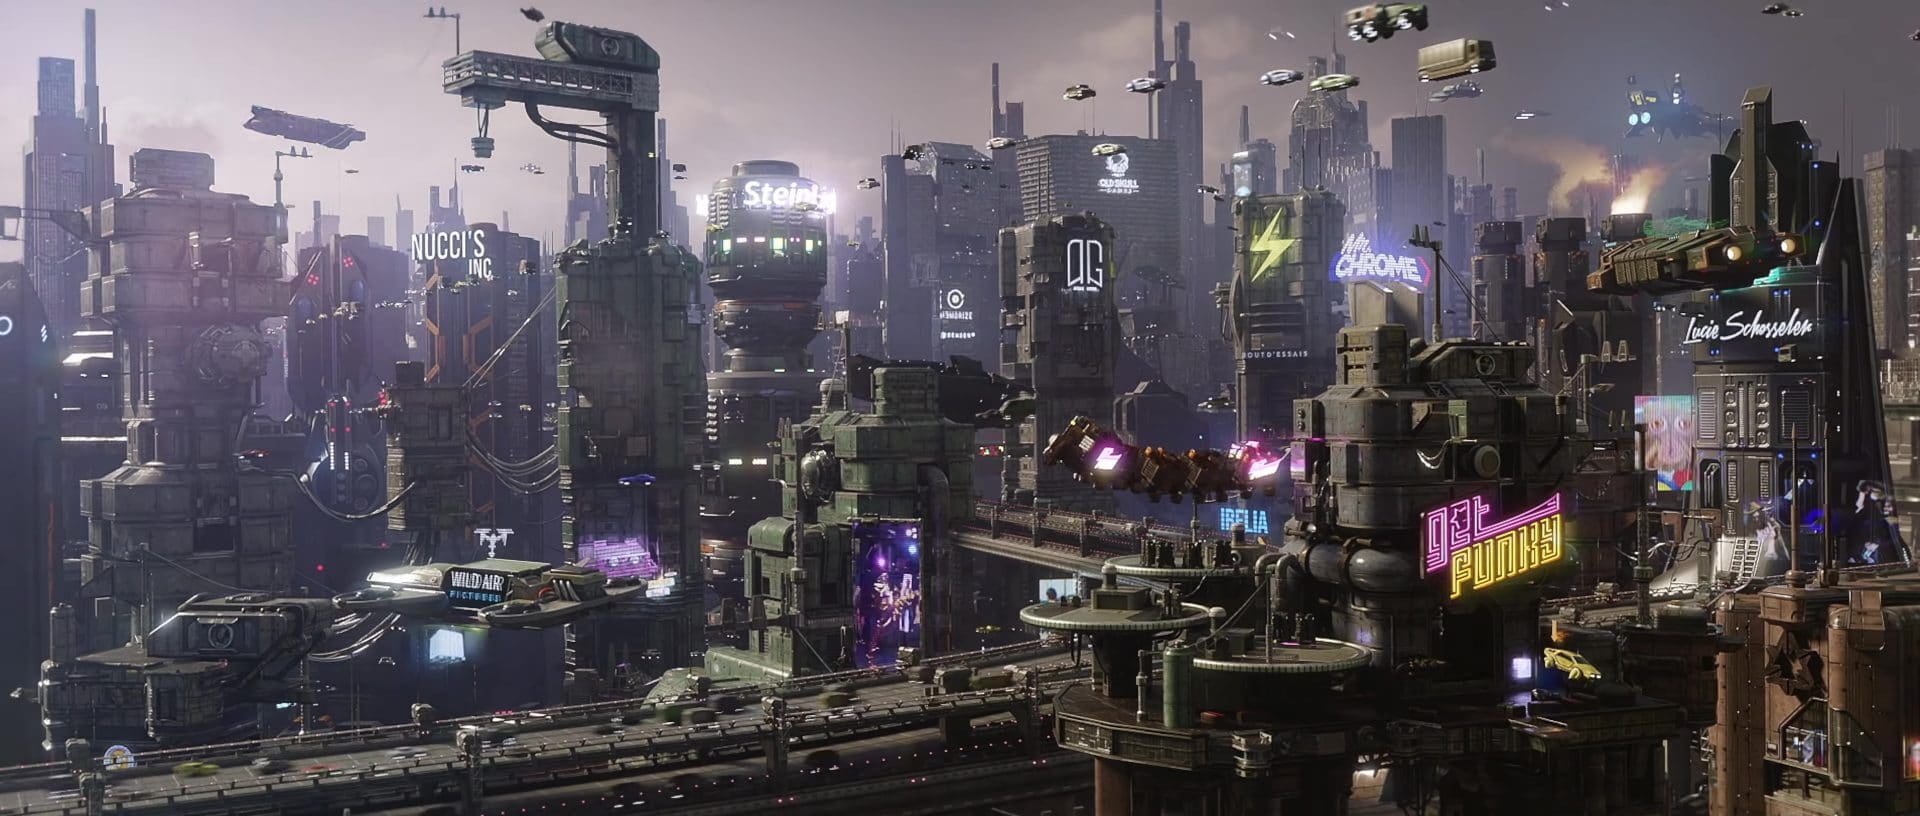
3DVF: The introduction sequence is, without a doubt, the most impressive part of the episode from a VFX/CGI standpoint. The camera is in space, gets closer and closer to a planet. A huge futuristic city appears with skyscrapers, flyings cars, people… How did you approach this breathtaking sequence?
It should be noted that the script only briefly described this sequence, it just said something like “the camera is within the stars and arrives at the heart of a megalopolis then in a dark room”. And we ended up with a 2 minutes sequence that could easily be a standalone short film.
It isn’t always like this, the Captain and Alexandre very often give much more detail about what they have in mind. But this time, they gave me carte blanche, as long as I began the shot in the stars and I ended the sequence in a dark room, with the broken pin. I could do whatever I wanted in between. For example, I was free to create a crowded city or an empty one.
This last part is quite typical of the way we approach things. For example, Lucie Schosseler (who is the artist behind the alien make-up/practical effects) is also free to explore new ideas and suggest bold concepts. Creative freedom is the key, which is why early on, some elements of the script may just be described by a few lines of text.
3DVF: This flexible approach probably also allows you to adjust the level of detail of a sequence depending on the time/budget constraints?
Indeed. The megalopolis is the result of one year of work, but I split the work in chunks. I would work on the CG city, then a few weeks later switch to another sequence of the episode, then switch back. In a way, the Covid-19 pandemic was an “opportunity” since it gave me much more time than what was anticipated. Which is why this sequence is so long: it was supposed to be less than 30 seconds long!
While we were on lockdown, and since the whole world was on hiatus, I worked hard at home, and I did some experiments. For example, hardly anyone uses Blender for crowd simulations.
If the pandemic didn’t took place, this shot would have been less impressive and much shorter!
3DVF: It’s true that this same idea, a camera zooming/moving from space to the ground, is a classic idea. Many movies do it but in the glimpse of an eye, not in such detail.
Indeed, the whole idea was to expand on this classic concept, so that the viewers would feel it was worth watching this new take on the same idea.
3DVF: How did you create the city?
During the layout process, I used basic 3D blocks for the buildings. For this kind of shot, the main character is the camera, which is why I spent a lot of time adjusting the camera movements. Working with basic shapes is not an issue. Same thing for the spaceship, by the way.
We did have to adjust the camera movements for technical reasons. Due to the way I laid out the scene, some elements were seen from a long distance as well as up close. This would have generated a lot of additional work compared to the final shot, with a long dive and only then tilting up the camera towards building in the background. If these buildings were visible earlier in the shot, I would have had to add much more detail, more people walking by, more flying cars, etc.
I also used a trick when the camera tilts up towards the skyscrapers in the background: these buildings are moving up in the 3D world, so that they are higher than the ones in the foreground. It makes no sense, but the end result is much more appealing.
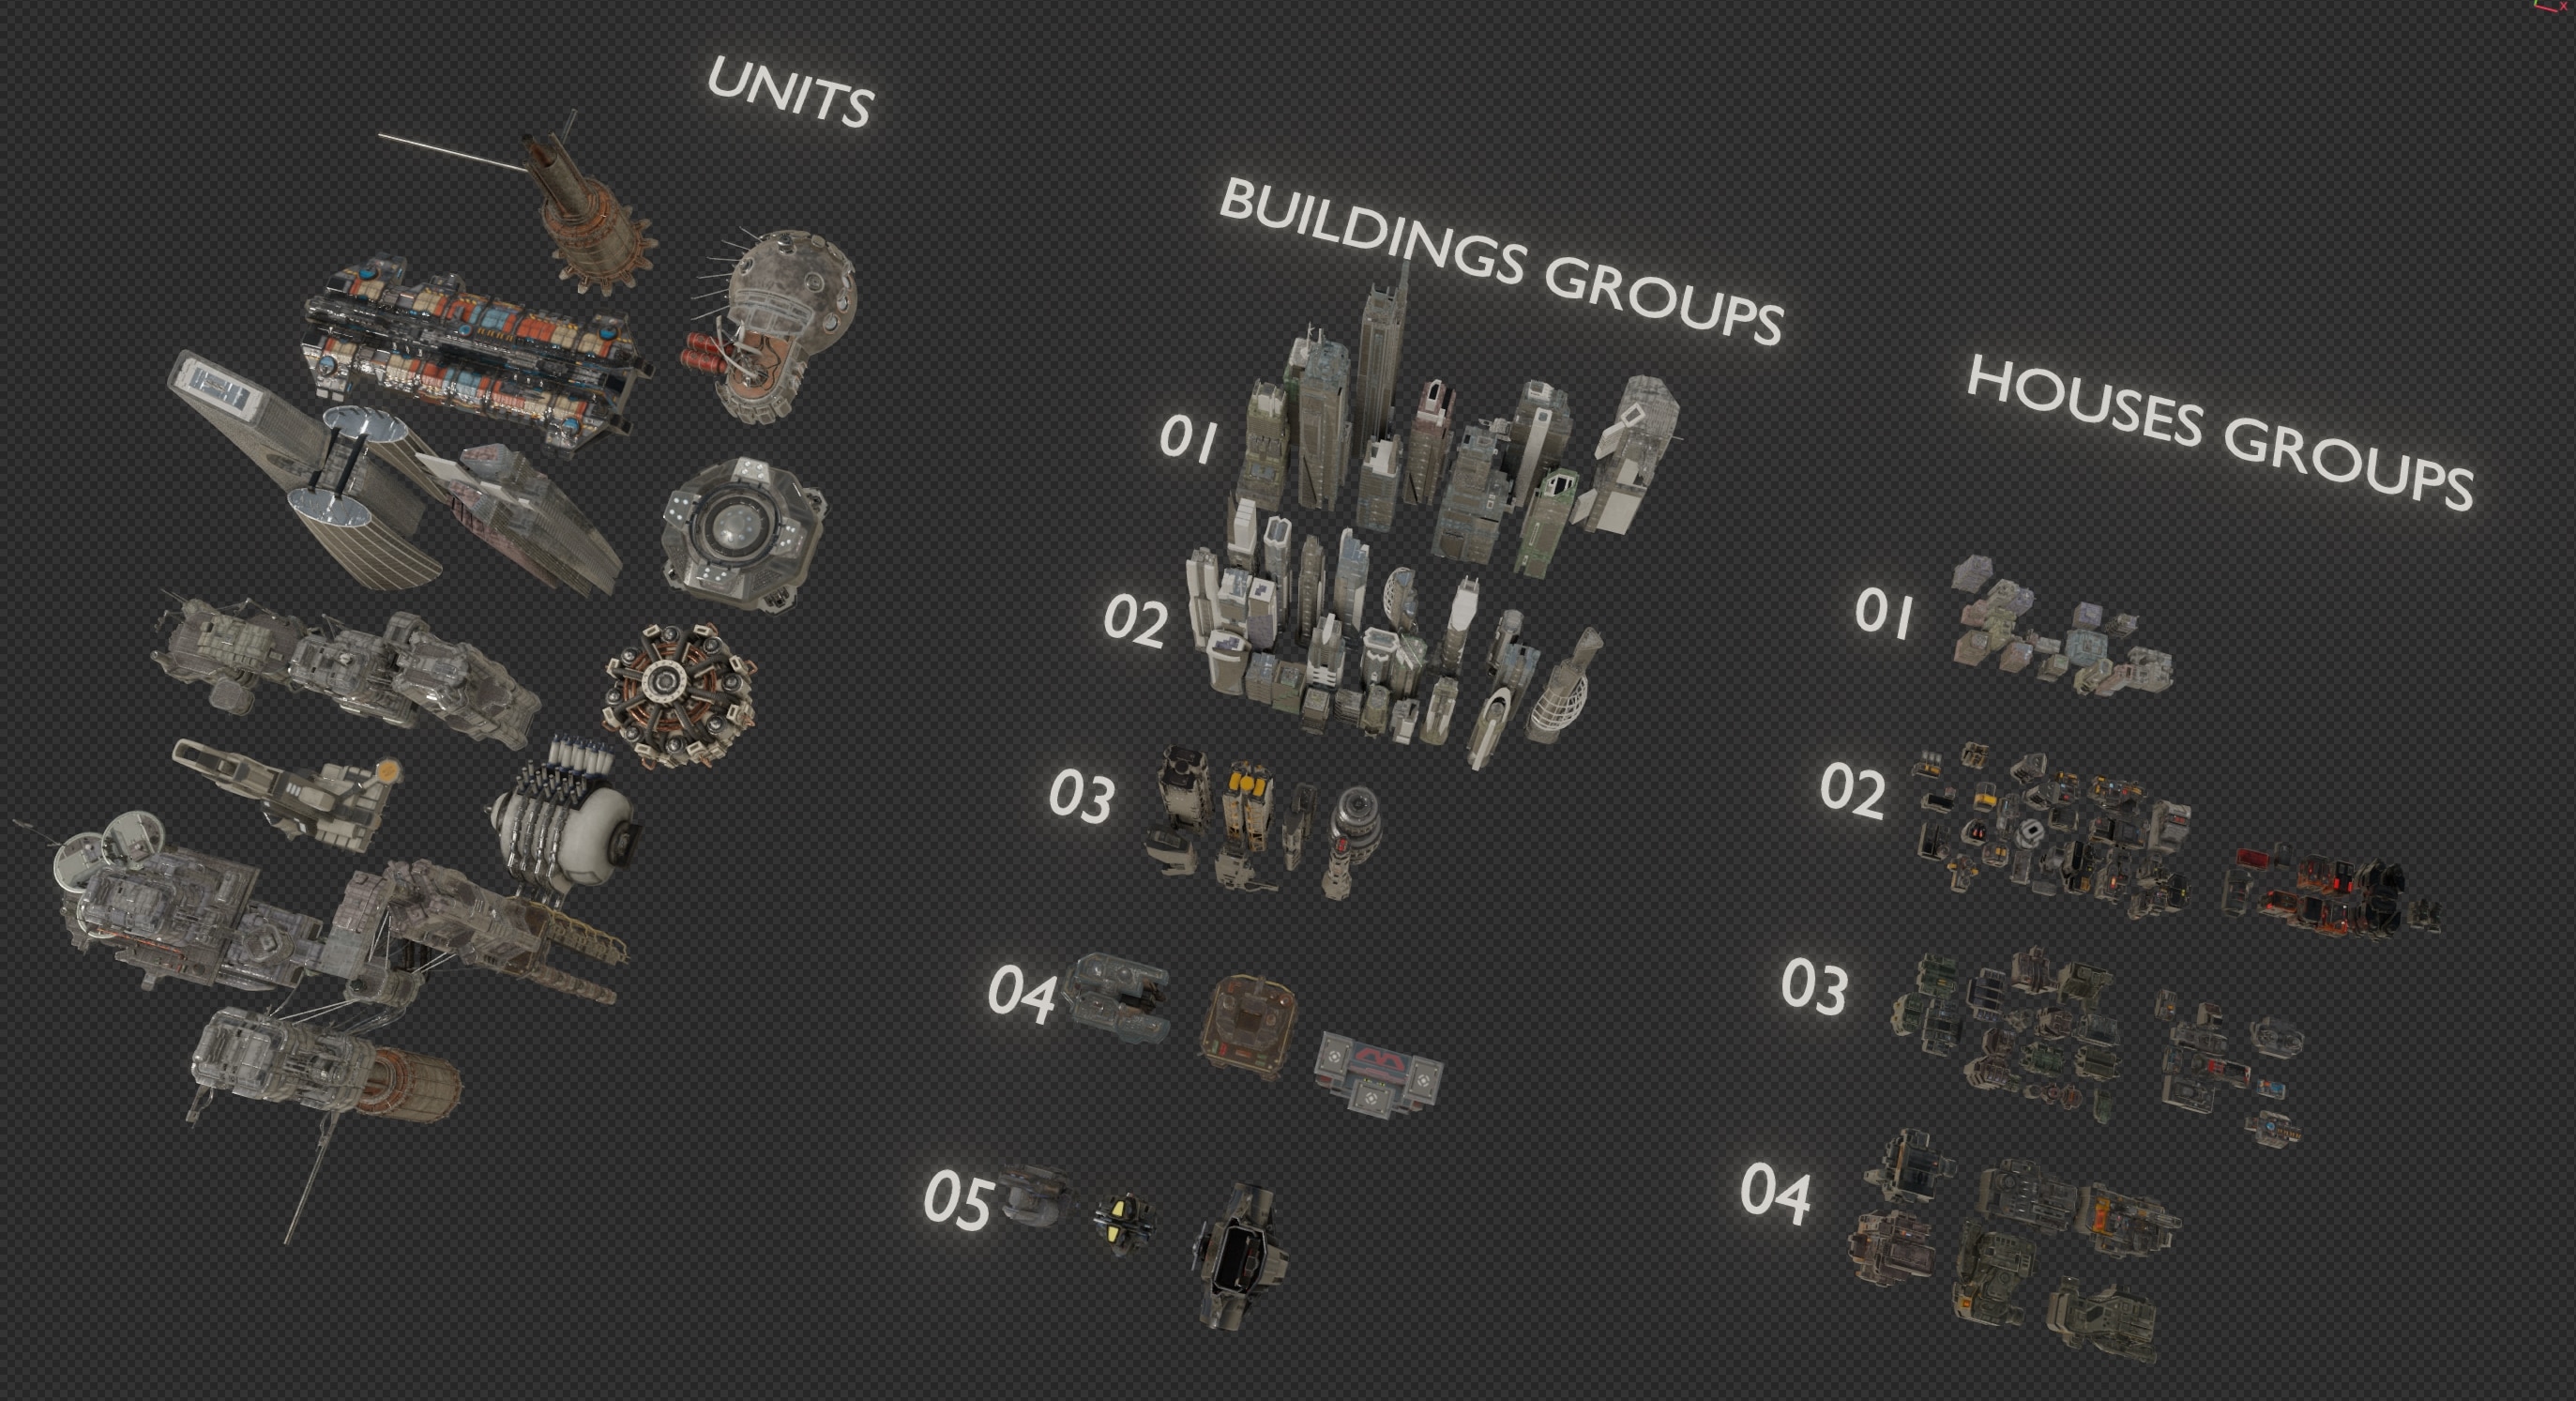
To create the buildings, I made a separate .blend file with all my building assets. I then used particles, vertex planes to add the bluidings into the scene. Except for the heart of the city: I had to do everything by hand in order to avoid collisions and to get something that has some aesthetic coherence.
I also used particles to generate building all over the ground, in order, well, to hide the ground. There are collisions everywhere, but in the end you don’t really see them.
Here are a few assets used to create the city:
3DVF: Some people may wonder why you didn’t use matte paintings for this shot, but this technique isn’t really helpful here, given the camera movements.
Indeed, which is why I decided to go full CG, even for the buildings that are very far away. No matte painting, no planes. I should also mention that I try to avoid this kind of trick as much as possible, because I usually notice when other artists use them. I might be too cautious. Although I still use these tricks from time to time.
In the end, I only used CG planes to create the sky and the smoke effects.
3DVF: You explained earlier that it is unusual to create crowds using Blender. Can you tell us more about how you did it, from a technical point of view?
I used particles… And a Blender bug! [laughs]
More specifically, Blender users can use particles called Boids [Editor’s note: they can be used to create schools of fish, for example]. If you use their default behaviour, they fly: a checkbox is supposed to make them stick to the ground but it doesn’t work, the particles keep flying.
The trick is to let them fly, but to tweak the settings: this way you can force them to stay on the ground.
When you use crowd simulations, you usually add walls to control and contain the crowd. Blender, however, was not created with crowd sims in mind, and if you ask the particles to bounce of a wall and to turn around, they will do so instantly, which does not look realistic.

The boids also have another bug (to be honest, this tool is quite broken) which is the answer to this issue. If you set up a wall so that 100% of the boids will bounce of it they will turn around instantly, if you set it to 98% (and 2% going through the wall) they still turn around instantly, but at 99% they turn around more slowly. It also means that a few people will go through the wall, but I tweaked the shot so that you can’t see it. And this is how I managed to create a crowd in Blender!
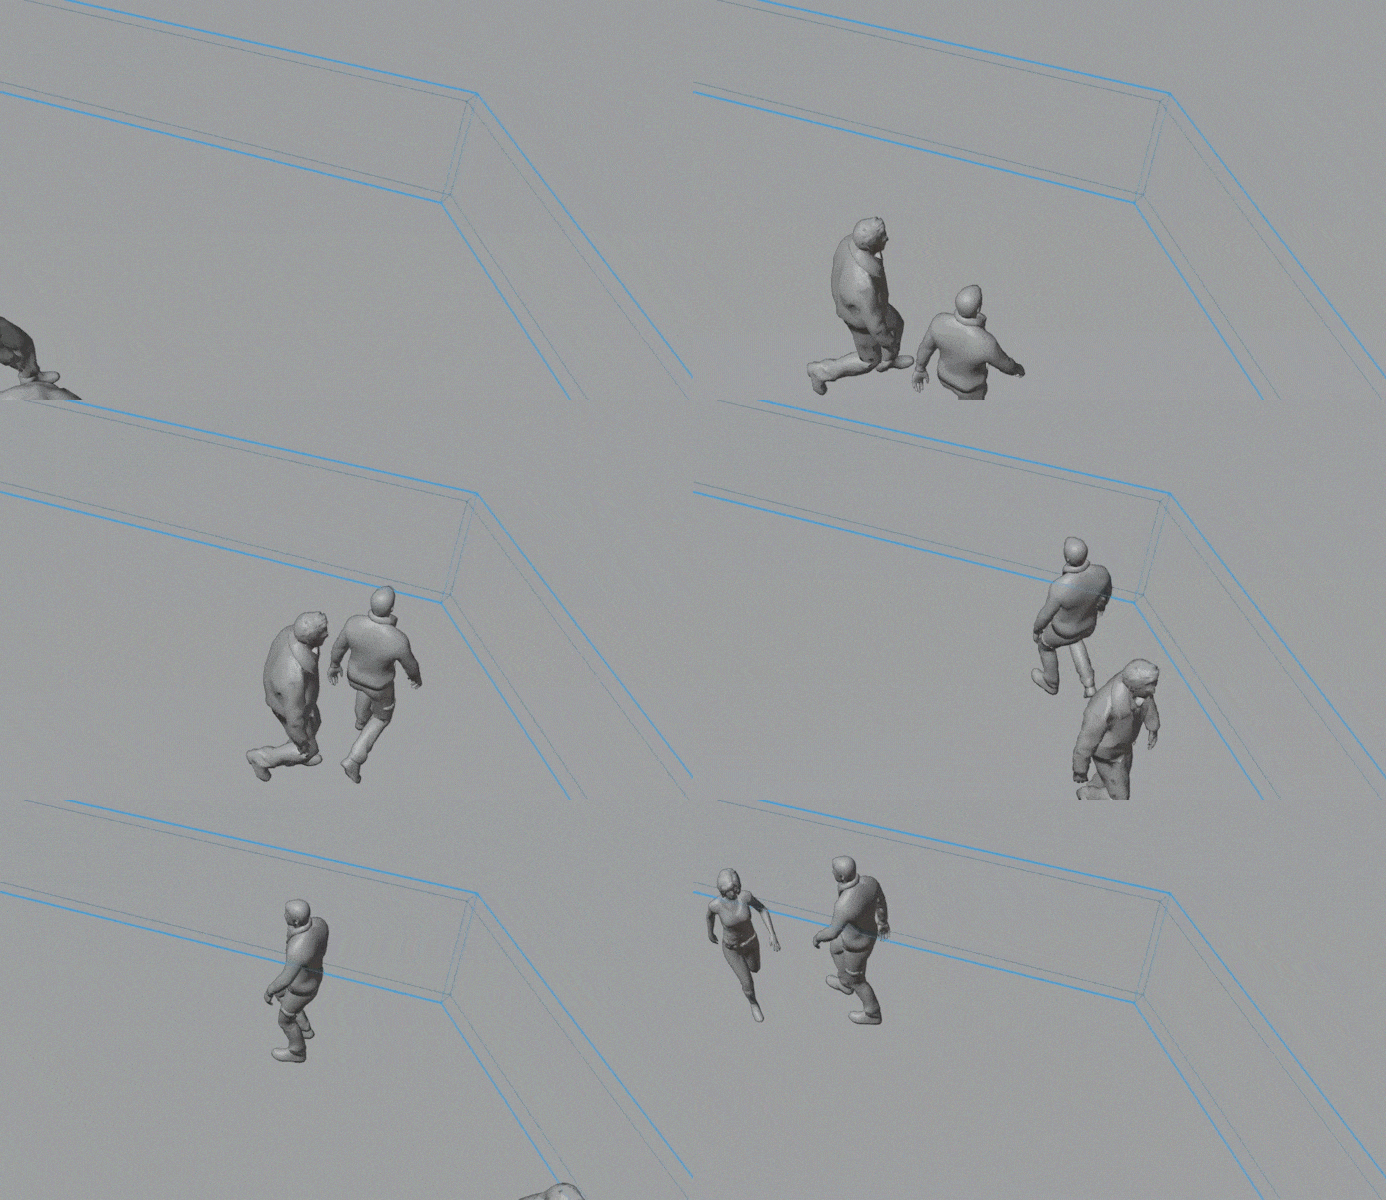
A lot of work was needed to achieve what you can see in the episode. I did a lot of research to understand how other artists managed to create crowds, but it usually was not satisfying. Ian Hubert did create a crowd for his short film Dynamo Dream but it was faster and less precise, there are collision issues with people walking through each other, whereas I checked each shot 15 times to make sure everything was ok. There are still a few issues with the waiters of the restaurant, they are walking but not moving forward. I wish I could do something about it, but I can’t render everything once more… And it’s too late anyway.
I should mention that some pedestrians were placed and animated by hand, and not using particles. I did not use Mixamo which was promising but still in its infancy, I mainly created some random motion using noise on the torso, arms and head. This way the characters look like they are eating or talking to each other. It’s a little bit to what you can see in GTA San Andreas but more subtle and with more randomness, no pattern movements.
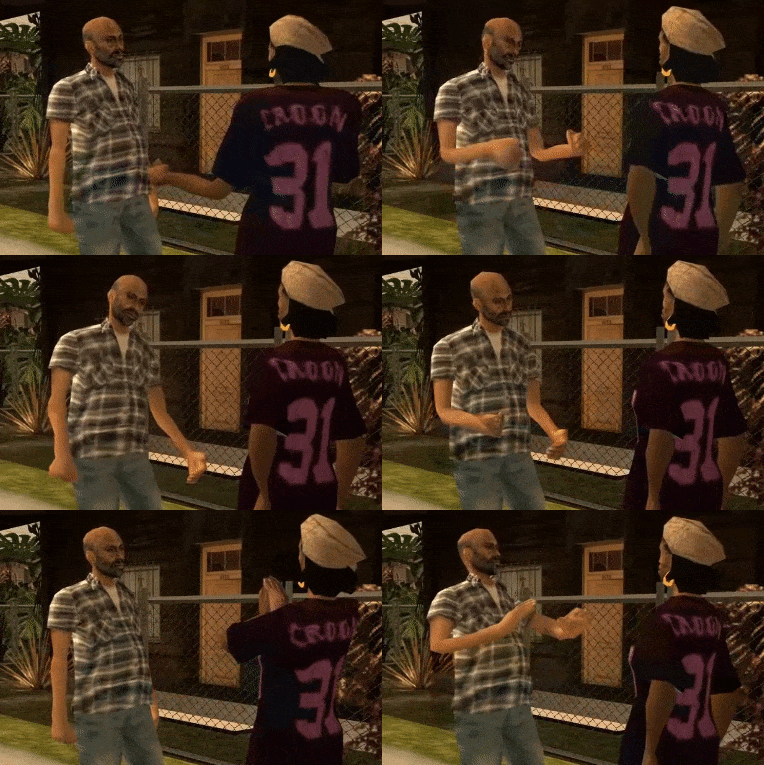
I also tweaked the shaders so that each particle/human will have a random appearance.
The 3D models used for the crowd were bought online, I then added a rig with a walk cycle. The animation doesn’t always fit the size of the characters (they don’t all have the same height), there is some foot sliding, more or less depending on their walking speed.
There is the same issue when they turn back, they walk slower and their feet slide a little bit.
Once again these issues are linked to the limitations of Blender, you can’t adjust the speed of an animation depending on the speed of a particle. I dealt with it by avoiding to shoot the crowd up close.
Up Next: other questions related to the introduction sequence, dogfights, teamwork, the atmospheric re-entry…
